AntiVir MailGate は個人利用ではフリーのアンチウィルスソフトです。ウィルスの駆除はクライアントマシンに駆除ソフトをインストールして対応することもできますが、サーバーマシンにもウィルスソフトを導入すれば、より安心感は増しますし、セキュリティも強化されます。特にメールサーバーを公開しているのであれば、これを機会に是非、導入しましょう。
|
|
 ■AntiVir MaiGate のダウンロード
■ライセンス登録
■AntiVir MaiGate のダウンロード
■ライセンス登録
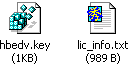
AntiVir MailGate はフリーのアンチウィルスソフトですが、使用する際には登録が必要となります。登録をすると自分のメールアドレス宛てにライセンスキーが送られてきますので、大切に保存しておいてください。実際に、AntiVir
MailGateを使用する時に必要となります。メールには以下の2つのファイルを添付されており、実際に使用するのは、
hbedv.key
です。なお、メールはすぐには送られてこず、筆者の場合は20分ぐらいかかりました。ライセンスの登録は
こちらから。
 ■AntiVir MaiGate のインストール
ソースを展開したディレクトリ内に avinstall.pl というファイルがありますので、このファイルでインストールします。ライセンス契約に同意後、いくつかの質問をされますが、ほとんどデフォルトで答えてしまって問題ありません。
$ cd /usr/local/src
$tar xzvf avlxmgt.tgz
$cd antivir-mailgate-2.0.1.16
# perl avinstall.pl
The copyright to this software is owned
by //ライセンスの同意契約が表示されます
中略
Do you agree the LICENSE (y/n): y
//ライセンス契約に同意しますか?
Enter the path of init directory
(default is: /etc/rc.d):
//init ディレクトリのパスを指定します。
Enter the path where AntiVir MailGate binaries
will be located
(default is: /usr/sbin):
//AntiVir MailGate
のバイナリがインストールされるパスを指定します。
Enter the path where scan engine and virus
definition file will be located
(default is: /usr/lib/AntiVir):
The directory /usr/lib/AntiVir doesn't
exists. Try again!
Should I create it? (y/n): y
//スキャンエンジンとウィルス定義がインストールされるパスを指定します。
Enter the path where manual pages will be
located
(default is: ): /usr/local/man
//マニュアルがインストールされるパスを指定します。
Enter the path to your license file:
/usr/local/hbedv.key
//ライセンスキーが置かれているバスを指定します。
The automatic internet updater will check
every hour
if a new update is available. Default is
yes.
Install the automatic internet updater?
(y/n): y
//自動アップデータをインストールするかどうか。
Creating directory /usr/lib/AntiVir
Installing new /usr/lib/AntiVir/antivir
with version: 6.23.0.1
Installing new /usr/lib/AntiVir/antivir.vdf
with version: 6.23.0.1
Installing new /usr/sbin/avgated with version:
2.0.1.16
Installing new /usr/sbin/avgatefwd with
version: 2.0.1.16
Installing config file /etc/avmailgate.conf
Installing config file /etc/antivir.conf
Enter the hosts and/or domains that are
local:
(default is: kororo.jp serv.kororo.jp):
//ホスト名を指定します。
Enter the hosts and networks that are allowed
to relay:
(default is: 127.0.0.1/8 192.168.0.0/16):
127.0.0.1/8 172.16.50.0/27 172.16.51.0/28
//リレーを許可するネットワークを指定します。
Installing config file /etc/avmailgate.acl
Installing start/stop script on a Redhat
System to /etc/rc.d/avgate
Creating /var/spool/avmailgate/incoming
Creating /var/spool/avmailgate/outgoing
Creating /var/spool/avmailgate/rejected
Installing license file to /usr/lib/AntiVir/avmgate.key
Installing /usr/local/man/man5/avmailgate.conf.5
Installing /usr/local/man/man8/avmailgate.8
AntiVir MailGate is now installed. Please
read the installation
description in the directory avmailgate
and follow the
instructions in INSTALL.sendmail, INSTALL.qmail,
INSTALL.postfix or INSTALL.exim.
Then start AntiVir MailGate "/usr/sbin/rcavgate
start". |
|
以上で、インストールは完了ですが、
(default is: /etc/rc.d): の質問でパスを指定しなかった方は、avgateを/etc/rc.d/init.d
下に移動させておきましょう。また、リンクも張りなおしておきます。
# mv /etc/rc.d/avgate
/etc/rc.d/init.d/avgate
# ln -s -i /etc/rc.d/init.d/avgate /etc/rc.d/rc2.d/S20avgate
# ln -s -i /etc/rc.d/init.d/avgate /etc/rc.d/rc2.d/K20avgate
# ln -s -i /etc/rc.d/init.d/avgate /etc/rc.d/rc3.d/S20avgate
# ln -s -i /etc/rc.d/init.d/avgate /etc/rc.d/rc3.d/K20avgate
# ln -s -i /etc/rc.d/init.d/avgate /etc/rc.d/rc5.d/S20avgate
# ln -s -i /etc/rc.d/init.d/avgate /etc/rc.d/rc5.d/K20avgate |
|
次にAntiVir MailGate が自動起動するようになっているかどうか確認します。
# chkconfig --list
avgate
avgate 0:オフ 1:オフ 2:オン 3:オン 4:オフ 5:オン
6:オフ |
|
■AntiVir MailGate の設定
まず、/etc/avmailgate.conf を開いて
PidDir を /var/tmp
から、/var/run/antivir に変更しておきます。次に、/var/run/antivir のディレクトリを作成し、パーミッションを755
とします。ディレクトリの所有権は、/etc/avmailgate.conf のUser と Group
で指定されている uucp に変更します。
# vi /etc/avmailgate.conf
PidDir /var/run/antivir
# mkdir -m 755 /var/run/antivir
# chown uucp:uucp /var/run/antivir |
|
その他、avmailgate.conf で環境に合わせて以下の行を変更しておきます。
MyHostName kororo.jp
PidDir /var/run/antivir
ListenAddress localhost port antivir
ForwardTo SMTP: localhost port smtp-backdoor
VirusAlertsUser root |
|
送られてきたライセンスファイルを /usr/lib/AntiVir にコピーし、所有者を uucp とします。
# mv /usr/local/hbedv.key
/usr/lib/AntiVir
# chown uucp:uucp /usr/lib/AntiVir/hbedv.key
|
|
■AntiVil MailGate の起動
ここまでの設定が完了したら、一旦、AntiVir MailGate を起動してみます。正常に起動することを確認したら、次にPostfix
との連携をとるために一時、停止させておきます(以下後述)。
# /etc/rc.d/init.d/avgate
start
Initializing AntiVir MailGate service: [
OK ]
# /etc/rc.d/init.d/avgate stop |
|
■ウィルス定義の手動アップデート
ウィルス定義を手動でアップデートするには以下コマンドを実行します。
# /usr/lib/AntiVir/antivir
--update
Warning: the file "antivir.vdf"
is more than 14 days old
AntiVir / Linux Version 2.0.9-6
Copyright (c) 1994-2003 by H+BEDV Datentechnik
GmbH.
All rights reserved.
checking for updates
06.23.00.01 <=> 06.23.00.23 [vdf
database, loaded]
06.23.00.01 <=> 06.23.00.23 [vdf
database, on-disk]
06.23.00.01 <=> 06.23.00.02 [scan
engine, running]
06.23.00.01 <=> 06.23.00.02 [scan
engine, on-disk]
antivir.vdf 100% |*********************|
1580 KB 112.91 KB/s 0:00 ETA
antivir 100% |************************|
316 KB 15.42 KB/s 0:00 ETA
06.23.00.23 <=> 06.23.00.23 [vdf
database, on-disk]
06.23.00.02 <=> 06.23.00.02 [scan
engine, on-disk]
scan engine 06.23.00.01 --> 06.23.00.02
(/usr/lib/AntiVir/antivir)
vdf database 06.23.00.01 --> 06.23.00.23
(/usr/lib/AntiVir/antivir.vdf)
AntiVir updated successfully
|
|
■cron による自動アップデート
ウィルス定義を自動でアップデートしたい場合は、/etc/crontab に以下の行を追加します。毎日、0時25分に実行するようにしています。筆者の場合は、既に追加されていましたが毎時25分ごとに設定されていたので、毎日0時55分に実行するようにしました。
| 25 0 * * * root /usr/lib/AntiVir/antivir
--update -q |
|
■Postfix 用の設定
Postfix とAntiVir MailGate との連携方法について解説します。連携させるには、/etc/postfix/master.cf
と /etc/postfix/main.cf に以下の行を追記します。追記する場所はどこでも構いませんが、一番下がわかりやすいでしょう。
# vi /etc/postfix/master.cf
# AntiVir MailGate
localhost:10025 inet n - n - - smtpd -o
content_filter=
# vi /etc/postfix/main.cf
content_filter = smtp:127.0.0.1:10024 |
|
/etc/services に以下の行を追加します。
# vi /etc/services
antivir 10024/tcp
smtp-backdoor 10025/tcp |
|
以上の設定を終えたら、AntiVir MailGateを再起動し、その後、Postfix をリロードします。
# /etc/rc.d/init.d/avgate
start
# /usr/sbin/postfix reload |
|
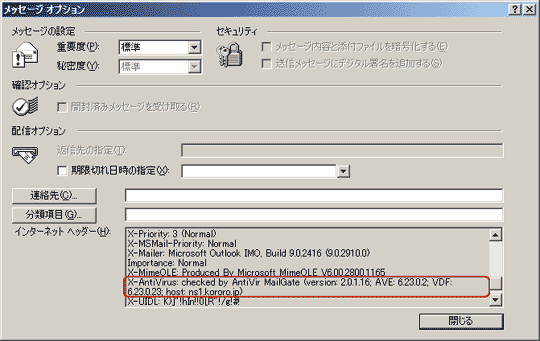
■AntiVir MailGate の動作確認
メールクライアントソフトでメールの送受信を行ってみます。その時、受信したメールのヘッダーにAntiVir
MailGate によってチェックされた旨のメッセージが表示されます。以下図のように表示されれば正常に稼動していることを確認できます。