Postfix と cyrus-sasl2
をソースからインストールする方法について解説していきます。
|
|
 ■cyrus-sasl のダウンロード
※追記 2005/8/8:cyrus-sasl-2.1.21.tar.gzでも以下の説明で動作確認OK
■cyrus-sasl のインストール
cyrus-sasl が既にインストールされている場合は、アンインストールします。
| # rpm -e cyrus-sasl
cyrus-sasl-devel cyrus-sasl-gssapi cyrus-sasl-md5
cyrus-sasl-plain |
|
$ cd /usr/local/src
$ tar xzvf cyrus-sasl-2.1.17.tar.gz
$ cd cyrus-sasl-2.1.17
$ ./configure --enable-login --with-plugindir=/usr/local/lib/sasl2
$ make
# make install |
|
 ■Postfixのダウンロード
■Postfixのインストール
Postfix がインストールされていないことを確認します。インストールされていたら削除してください。
$ cd /usr/local/src
$ tar xzvf postfix-2.0.16.tar.gz
$ cd postfix-2.0.16
$ make //SMTP-AUTH対応にするには以下後述 |
|
SMTP-AUTH 認証の設定を終えて、いざ再起動してみると以下のようなエラーが表示されました。何も考えずにインストールしたため、Postfix
がSMTP認証対応でインストールされていないとは露知らず…。
/[src]/README_FILES/SASL_README を読んでみるとどうやらmake 時に以下のようなオプションを指定しなくてはならないらしいです。なお、SASL1.5.5と2.1.1では指定するオプションも微妙に異なってくるため注意してください。また、以前にpostfixをmakeしたことがある場合は、ソースを展開したディレクトリから不要なデータを削除するためmake
tidy を実行します。cyrus-sasl のパスは各自ご自分の環境を指定してください。
◎
For SASL version 2.1.1
$ make tidy
$ make makefiles CCARGS="-DUSE_SASL_AUTH
-I/usr/local/include/sasl" AUXLIBS="-L/usr/local/lib
-lsasl2" |
|
■Posffix 専用のユーザーとグループの作成
Postfix 専用のユーザーを postfix として作成します。503と97 は各自、使用されていないユーザーIDを指定するようにしてください。また、シェルは必要ないので
/sbin/nologin 、ホームディレクトリも必要ないので none と指定しています。
# useradd postfix
# vi /etc/passwd
postfix:x:503:503::/none:/sbin/nologin |
|
続けて、postdrop グループを追加します。
# groupadd postdrop
postdrop:x:504: |
|
/etc/aliases にpostfix の欄を追加します。Red Hat の場合は標準で登録されています。また、root
のエイリアスとして実際にメールが配送されるユーザーを指定しておきます。
# vi /etc/aliases
postfix: root
# Person who should get root's mail
root: kororo |
|
編集し終えたら、newaliasesコマンドを実行して、エイリアスデータベースの作成を行います。
■共有ライブラリをシステムに認識させる
Red Hat Linux では、デフォルトでは、/etc/ld.so.conf に/usr/local/lib
へのPATH が加えられていないため、インストール時に共有ライブラリが見つかりません、というエラーが発生することがあります。Postfixもmake
install 時に
libsasl2.so.2が見つからないのが原因でエラーが発生したり、以下後述するmake
install 時の質問で、デフォルトのパスが表示されないため、手入力で打ち込まなくてはならなくなるかもしれないので、予め共有ライブラリへのPATH
をシステムに認識させておきます。認識させるには、/etc/ld.so.conf に/usr/local/lib
を追記します。追記後、変更を有効にするために、ldconfig コマンドを実行します。追加されたライブラリを閲覧するには、
ldconfig
-v コマンドを実行します。
# vi /etc/ld.so.conf
/usr/local/lib
/usr/local/lib/sasl2
# ldconfig
# ldconfig -v
/usr/local/lib:
libsasl2.so.2 ->
libsasl2.so.2.0.17 |
|
以上の編集を終えたら、make install を実行します。いろいろ質問をきかれますが、全てデフォルトで答えてしまって問題ありません。
# make install
/bin/sh postfix-install
Warning: if you use this script to install
Postfix locally,
this script will replace existing sendmail
or Postfix programs.
Make backups if you want to be able to recover.
Before installing files, this script prompts
you for some definitions.
Most definitions will be remembered, so
you have to specify them
only once. All definitions should have a
reasonable default value.
Please specify the prefix for installed
file names. Specify this ONLY
if you are building ready-to-install packages
for distribution to other
machines.
install_root: [/]
Please specify a directory for scratch files
while installing Postfix. You
must have write permission in this directory.
tempdir: [/usr/local/src/postfix-2.0.16]
Please specify the final destination directory
for installed Postfix
configuration files.
config_directory: [/etc/postfix]
Please specify the final destination directory
for installed Postfix
daemon programs. This directory should not
be in the command search path
of any users.
daemon_directory: [/usr/libexec/postfix]
Please specify the final destination directory
for installed Postfix
administrative commands. This directory
should be in the command search
path of adminstrative users.
command_directory: [/usr/sbin]
Please specify the final destination directory
for Postfix queues.
queue_directory: [/var/spool/postfix]
Please specify the final destination pathname
for the installed Postfix
sendmail command. This is the Sendmail-compatible
mail posting interface.
sendmail_path: [/usr/sbin/sendmail]
Please specify the final destination pathname
for the installed Postfix
newaliases command. This is the Sendmail-compatible
command to build
alias databases for the Postfix local delivery
agent.
newaliases_path: [/usr/bin/newaliases]
Please specify the final destination pathname
for the installed Postfix
mailq command. This is the Sendmail-compatible
mail queue listing command.
mailq_path: [/usr/bin/mailq]
Please specify the owner of the Postfix
queue. Specify an account with
numerical user ID and group ID values that
are not used by any other
accounts on the system.
mail_owner: [postfix]
Please specify the group for mail submission
and for queue management
commands. Specify a group name with a numerical
group ID that is
not shared with other accounts, not even
with the Postfix mail_owner
account. You can no longer specify "no"
here.
setgid_group: [postdrop]
Please specify the destination directory
for the Postfix on-line manual
pages. You can no longer specify "no"
here.
manpage_directory: [/usr/local/man]
Please specify the destination directory
for the Postfix sample
configuration files.
sample_directory: [/etc/postfix]
Please specify the destination directory
for the Postfix README
files. Specify "no" if you do
not want to install these files.
readme_directory: [no]
Updating /usr/libexec/postfix/bounce...
Updating /usr/libexec/postfix/cleanup...
Updating /usr/libexec/postfix/error...
Updating /usr/libexec/postfix/flush...
~省略~ |
|
 ■/etc/postfix/main.cf の編集
Postfix をSMTP-AUTH 対応にするには、以下の行を追記します。注意しておきたいのは、Postfix2.0
からは、
check_relay_domains ではなく、
reject_unauth_destinationに置き換わっています。また、
外部からのメールが受信できるようにするためには、最後の
reject を必ず削除してください。
smtpd_sasl_auth_enable
= yes
smtpd_sasl_local_domain = $mydomain
smtpd_sasl_security_options = noanonymous,
noplaintext
smtpd_recipient_restrictions = permit_mynetworks,
permit_sasl_authenticated, reject_unauth_destination,
reject
broken_sasl_auth_clients=yes |
|
■Postfix の起動
# /usr/sbin/postfix
start
# tail /var/log/maillog
Jan 2 07:40:31 ns1 postfix/postfix-script:
starting the Postfix mail system
Jan 2 07:40:31 ns1 postfix/master[23555]:
daemon started -- version 2.0.16 |
|
■sasldb2のパスワードデータベースの指定
sasldb2 を使用するには、/usr/lib/sasl2/smtpd.conf に以下の行を追記しておきます。デフォルトでは、smtpd.conf
は用意されていないので作成します。なお、pwcheck_method は、パスワード認証の方法を指定するもので、cyrus-sasl
2を使用する場合は、auxprop を指定します。なお、auxpropはデフォルトで指定されているため、以下のファイルを作成しなくても問題ありません。
# touch /usr/lib/sasl2/smtpd.conf
# vi /usr/lib/sasl2/smtpd.conf
pwcheck_method: auxprop |
|
■ユーザーの新規登録
mydomain は/etc/postfix/main.cfのsmtpd_sasl_local_domainに指定したものを指定します。
# saslpasswd2 -c
-u `/usr/sbin/postconf -h mydomain` kororo
# sasldblistusers2
kororo@kororo.jp: userPassword
kororo@kororo.jp: cmusaslsecretOTP |
|
■/etc/sasldb2の所有権を変更する
Postfix が/etc/sasldb を参照できるようにファイルの所有権とパーミッションを変更します。
# chgrp postfix
/etc/sasldb2
# chmod 640 /etc/sasldb2
# ls -l /etc/sasldb2
-rw-r----- 1 root postfix 12288 1月 2
08:48 /etc/sasldb2 |
|
■PLAIN 認証の動作確認
エンコードした後、telnet して確認します。「235 Authentication successful
」と表示されれば、PLAIN認証は成功したことが確認することができます。
# printf 'kororo\0kororo\0hogehoge'
| mmencode
a29yb3JvAGtvcm9ybwBob2dlaG9nZQ==
# telnet localhost 25
Trying 127.0.0.1...
Connected to localhost.
Escape character is '^]'.
220 mx.kororo.jp ESMTP Postfix
EHLO localhost
250-mx.kororo.jp
250-PIPELINING
250-SIZE 10240000
250-VRFY
250-ETRN
250-AUTH LOGIN PLAIN OTP DIGEST-MD5 CRAM-MD5
250-AUTH=LOGIN PLAIN OTP DIGEST-MD5 CRAM-MD5
250-XVERP
250 8BITMIME
AUTH PLAIN a29yb3JvAGtvcm9ybwBob2dlaG9nZQ==
235 Authentication successful
quit
221 Bye
|
|
◎トラブルシューティング
なお、Telnet した際に接続を切られてしまい、ログに、fatal:
no SASL authentication mechanismsというエラーが表示された場合は、/etc/sasldb2
がないか、sasl のダイナミックリンクがうまくいっていないなどの可能性があります。また、chroot
環境の場合はの/var/spool/postfix (queue_directory)からの相対パスにsasldb2
を置く必要があるので注意してください。その他、筆者の場合では、Red Hat 付属のcyrus-sasl-2.1.10-4.i386.rpmがインストールされていると接続することができなかったので必ずアンインストールをしてから接続するようにしてください。
unable to open Berkeley db /etc/sasldb2
Berkeley DBを開けないというようなエラーメッセージが表示され、SASL認証に失敗してしまう場合は、main.cf
内の「smtpd_sasl_local_domain =$mydomain 」を「smtpd_sasl_local_domain
=」、あるいは、「smtpd_sasl_local_domain =$myhostname」に変更してみてください。
|
|
■Becky!のプロトコルログで確認してみる
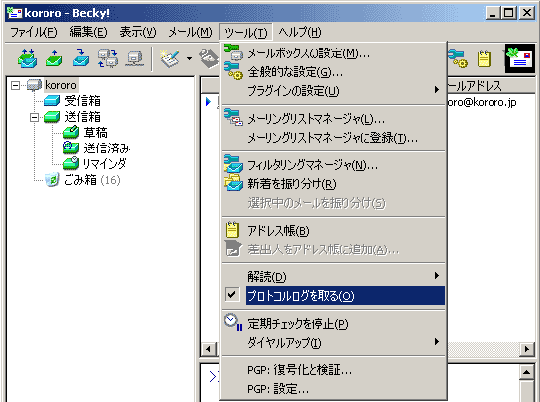
以上の確認がとれたら、クライアントからPLAIN 認証を使用してメールを送信してみてください。その時のログを見てみると、以下のように成功した旨のメッセージが表示されているはずです。メールクライアントは以下図を参照してください。その他、CRAM
MD5認証やログイン認証ができるかどうかも確認して置いてください。また、外部からの不正中継を許可していないかどうか、外部から本当にメールが送れるかどうかなども前もって確認しておいてください。なお、CRAM-MD5
を使用したとしても、/etc/sasldb2 には、パスワードが平文で格納されるため、決して安全であると言い切れるわけではありません。もし、もっと安全で確実な方法をとるならば、TLSによる暗号化通信を行う必要があります。
 ◎Becky のプロトコルログ
>>> Connecting
to "mx.kororo.jp" [2004/01/02
11:50:02] <<<
220 mx.kororo.jp ESMTP Postfix
EHLO [172.16.50.4]
250-mx.kororo.jp
250-PIPELINING
250-SIZE 10240000
250-VRFY
250-ETRN
250-AUTH LOGIN PLAIN OTP DIGEST-MD5 CRAM-MD5
250-AUTH=LOGIN PLAIN OTP DIGEST-MD5 CRAM-MD5
250-XVERP
250 8BITMIME
AUTH CRAM-MD5
334 PDQNzREzODE0NDuMTYwNDRcyDlAbXgua29b3JvmpwPg==
235 Authentication successful
RSET
250 Ok
MAIL FROM:<kororo@kororo.jp>
250 Ok
RCPT TO:<kororo@kororo.jp>
250 Ok
DATA
354 End data with <CR><LF>.<CR><LF>
.
250 Ok: queued as 8C3BD2FB84
QUIT
221 Bye |
|
 ■Postfix の自動起動設定
RedHat9に標準付属していたPostfix1.1.11用の自動起動スクリプトがそのまま利用できそうだったのでこれを、/etc/rc.d/init.d/postfix
に保存します。自動起動スクリプトは
こちら。環境によっては変更の必要があるかもしれません。
# cd /etc/rc.d/init.d
# chmod 755 postfix
# chkconfig --add postfix
# chkconfig --list postfix
postfix 0:オフ 1:オフ 2:オン 3:オン 4:オン 5:オン 6:オフ
|
|
 ◆参考
Postfix設定パラメータ